Skeleton Makeup: Step-by-Step Tutorial, Products and Safety
Introduction
Skeleton makeup is one of the most recognizable Halloween and costume-party looks, but you do not need professional special-effects skills to create it. With a few basic face-painting products, some brushes, and careful blending, you can transform an ordinary makeup look into a dramatic skull-inspired design.
The classic skeleton style usually combines a pale or white base with dark eye sockets, a black nose, hollow-looking cheekbones, and teeth drawn across the mouth. More creative versions can include gray shading, cracks, glitter, colorful details, or a glamorous half-skull design. Professional tutorials often build the look through simple layers of light and dark makeup rather than trying to create every detail at once.
Whether you are preparing for Halloween, a costume party, cosplay event, photoshoot, or simply want to experiment with dramatic face paint, this guide explains how to create skeleton makeup from start to finish.
What Is Skeleton Makeup?
Skeleton makeup is a face-painting style designed to make the face resemble a human skull. Instead of simply painting the face black and white, the technique uses contrasting shades to imitate the appearance of eye sockets, cheekbones, nasal openings, teeth, and other skeletal structures.
The traditional version uses:
- White face paint
- Black face paint
- Gray or dark eyeshadow
- Black eyeliner
- Makeup brushes
- Makeup sponges
- Setting powder or setting spray
Modern versions can be much more creative. You can create a full skull, half-skull, glam skeleton, colorful skeleton, realistic skull, or minimalist version depending on your skill level and the occasion. Half-skull designs are especially popular because they combine dramatic skeletal details with regular makeup on the other side of the face.
What You Need for Skeleton Makeup
You do not need an enormous makeup collection. A simple kit can be enough for a convincing result.
Basic Products
- White face paint
- Black face paint
- Gray or black eyeshadow
- Black eyeliner pencil
- Black liquid eyeliner
- Translucent setting powder
- Setting spray
- Makeup sponge
- Small detail brushes
- Flat makeup brush
- Blending brush
Some tutorials also use shimmer, glitter, or colored eyeshadow for a more glamorous interpretation.
Choosing Face Paint
Always choose products specifically intended for use on skin. Do not substitute craft paint or other materials that are not designed for cosmetic use. The FDA specifically advises consumers not to put products on the face that are not intended for skin and to follow product labeling, particularly around the eyes.
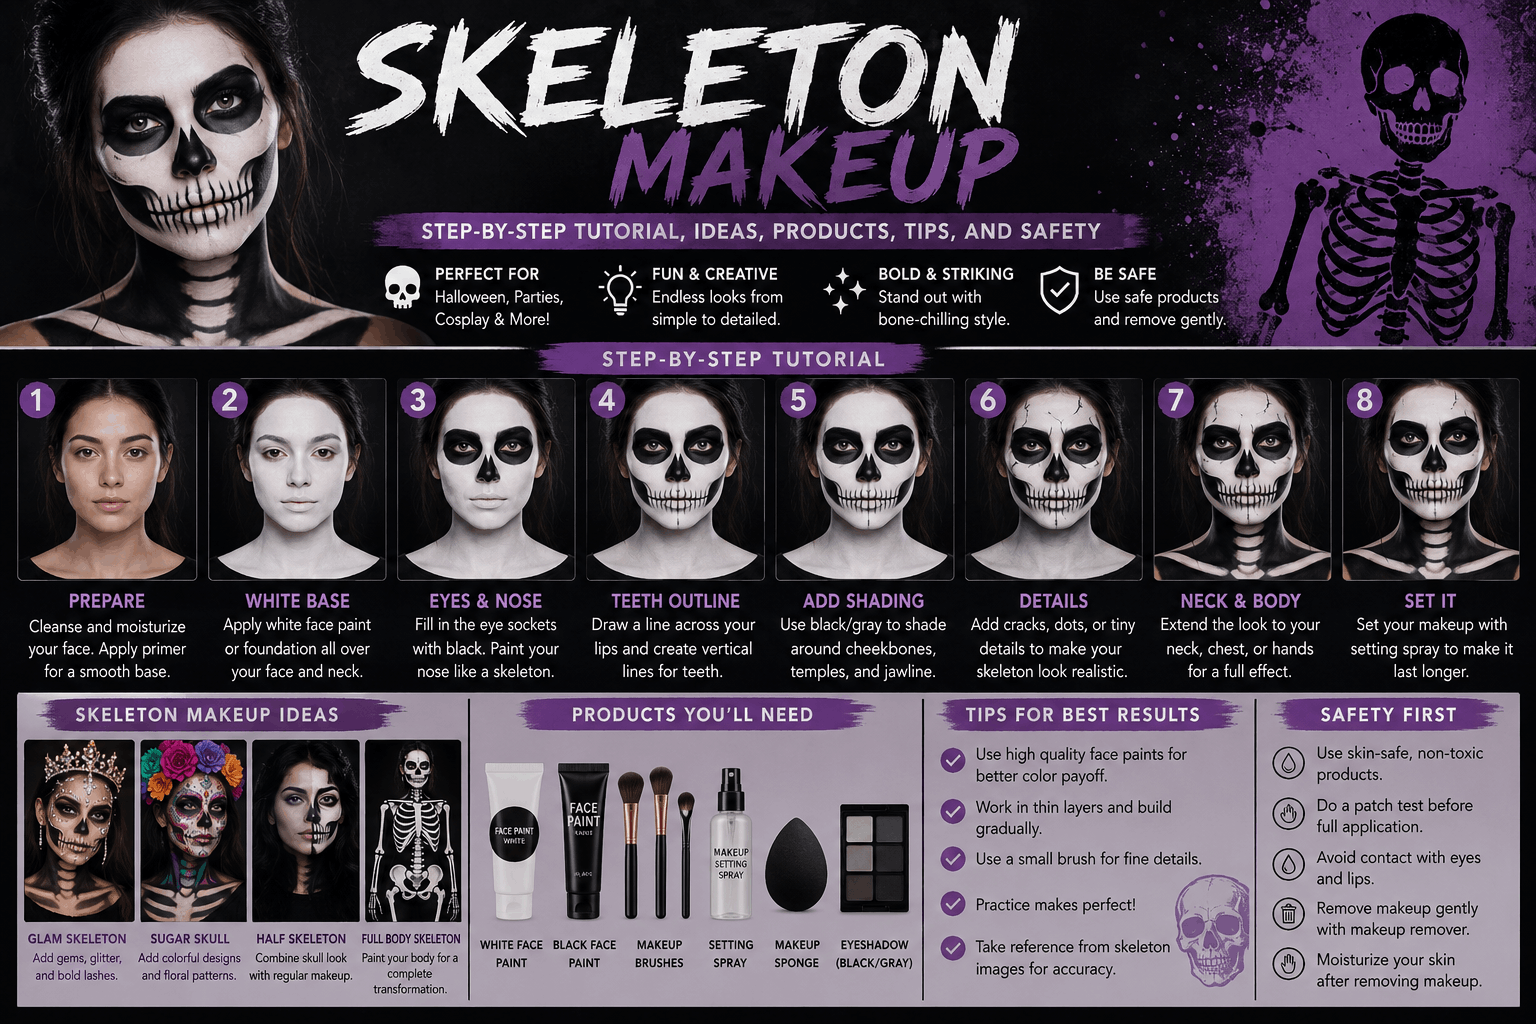
Step 1: Prepare Your Skin
Start with clean, dry skin.
Remove excess oil and make sure there is no heavy skincare residue on the surface. If your skin feels dry, apply a suitable moisturizer and allow it to settle before beginning.
A light primer can also help create a smoother surface and improve makeup adhesion. Some professional tutorials recommend beginning with clean skin and using moisturizer or primer before applying face paint.
Before using a new product, particularly if you have sensitive skin, consider testing it on a small area according to the product’s directions.
Step 2: Apply the White Base
The white base creates the characteristic skull appearance.
Use a makeup sponge to apply a thin, even layer of white face paint across the areas you want to transform. For a traditional full-face skeleton, this usually includes the forehead, cheeks, chin, and other visible facial areas.
Avoid getting cosmetic products into your eyes.
You do not necessarily need an extremely thick layer. Building coverage gradually can make the makeup easier to control and blend.
For a full skull effect, many tutorials extend the white makeup down toward the neck so that the natural skin color does not interrupt the skeletal illusion.
Step 3: Create the Eye Sockets
The eyes are one of the most important parts of skeleton makeup.
Using black face paint or eyeliner, outline the general shape around each eye. Then carefully fill the area with black.
For a more realistic effect, you can make the outer edges slightly larger and blend gray or black eyeshadow around them.
Do not worry about creating perfectly circular eyes. Following the natural shape of your brow and eye area can produce a more convincing result.
Keep products intended for the skin away from the actual eye unless the label specifically indicates that they are suitable for that area. Some face paints are not designed for use near the eyes.
Step 4: Paint the Skeleton Nose
The skull nose is usually represented by a dark triangular or rounded shape.
Use a small detail brush to create the shape around the lower and central part of the nose. Fill it with black paint while leaving the surrounding white area intact.
For a more dimensional appearance, add a little gray around the edges rather than creating one completely flat black shape.
Some tutorials recommend a triangular nose shape while others use two rounded openings, so you can choose whichever design matches your overall skull style.
Step 5: Define the Cheekbones
This is where skeleton makeup begins to look much more three-dimensional.
The goal is to create the illusion that the cheeks are hollow.
Use a thin brush to draw a dark line beneath the natural cheekbone. Then blend the black or gray downward and outward.
Do not simply draw a harsh black stripe and leave it unblended. Softening the edges with gray or a blending brush can create a shadow-like appearance.
A professional skeleton tutorial recommends placing dark makeup along the bottom of the cheekbone and gradually blending it to create the appearance of a hollow skeletal structure.
Beginner Tip
Start with less product.
You can always make the cheekbone darker, but removing an excessive amount of black paint can be difficult once it has been applied.
Step 6: Create the Jawline
The jaw can make your skeleton look much more realistic.
Follow the natural structure of your lower face and create a dark contour along the jawline. Blend portions of the black into the white base to create depth.
For a more dramatic effect, extend the shading toward the sides of the face.
The objective is to suggest the shape of a skull rather than simply outlining your face with black paint.
Step 7: Create the Skeleton Teeth
The mouth is one of the signature features of skeleton makeup.
Start with a dark line following the natural meeting point of your lips. Then extend the line slightly beyond the corners of your mouth if you want a wider skull effect.
Next, draw vertical lines across the mouth to represent individual teeth.
Keep the spacing relatively even, but do not worry if every tooth is identical. Slight irregularities can actually make the design appear more organic and skeletal.
For more advanced looks, you can create longer teeth near the corners or use gray shading between individual teeth to create depth. Skeleton tutorials commonly use a dark horizontal mouth line followed by vertical tooth divisions.
Step 8: Add Gray Shading
Black and white alone can sometimes make skeleton makeup look flat.
Gray is useful for creating transitions between the two colors.
Use gray eyeshadow or a mixture of black and white face paint to add shadows around:
- Cheekbones
- Temples
- Eye sockets
- Nose
- Jawline
- Teeth
- Forehead
Keep the darkest areas close to the deepest-looking parts of the skull and gradually soften the color outward.
This creates the illusion of depth without requiring complicated special-effects techniques.
Step 9: Add Skull Cracks
Cracks are an easy way to make your skeleton makeup more detailed.
Using a fine black eyeliner brush, draw a few irregular lines across the forehead, cheek, or chin.
Avoid making every crack perfectly straight. Natural-looking cracks tend to branch or change direction.
You can also add a small amount of gray shadow beside the crack and a thin white highlight on one side to make it look raised.
Cracked lines are commonly used as a final detail in skeleton face-paint designs. (hobbycraft.co.uk)
Step 10: Extend the Skeleton to the Neck
If your outfit leaves your neck visible, extending the makeup can make the overall look more convincing.
You can create horizontal or curved bone shapes along the neck and use black and gray shading to separate them.
One classic technique involves drawing repeated oval shapes and shading one side of each shape, leaving some white space as a highlight.
You can also continue the jawline downward and add collarbone-inspired skeletal details.
Step 11: Set Your Skeleton Makeup
Setting the makeup is especially useful when you plan to wear the look for several hours.
Once your cream or face-paint layers are complete, gently press translucent setting powder over the design where appropriate.
Do not aggressively brush over detailed areas because this can disturb the design.
A traditional skeleton makeup tutorial recommends pressing translucent powder into the makeup and then lightly removing excess powder.
A suitable setting spray can also be used according to its directions.
Easy Skeleton Makeup for Beginners
If you are new to face painting, you do not need to attempt an elaborate realistic skull.
Try this simple five-part version:
- Apply white face paint.
- Create black eye sockets.
- Paint the nose black.
- Add dark cheekbone shadows.
- Draw the mouth and teeth.
This gives you the recognizable skeleton appearance without requiring advanced anatomy or special-effects techniques.
A simple design can still look impressive when the edges are clean and the black-and-white contrast is well blended. (Namaki Cosmetics)
Half-Skull Skeleton Makeup
Half-skull makeup is a great option if you want something dramatic but don’t want to cover your entire face.
Divide your face visually down the center.
On one side, create the complete skeleton design with:
- White base
- Black eye socket
- Skull nose
- Hollow cheek
- Teeth
- Jaw details
On the other side, keep your regular makeup.
You can use glamorous eyeshadow, lashes, blush, contour, or lipstick on the non-skeleton side.
This contrast creates a striking effect and is one reason half-skull looks are popular for Halloween and costume events. (Glamour)
Glam Skeleton Makeup
Skeleton makeup does not have to be completely scary.
For a glam version, combine the traditional skull structure with:
- Metallic eyeshadow
- Glitter
- Rhinestones
- False lashes
- Shimmer
- Colored eyeshadow
- Glossy highlights
Purple, red, silver, and jewel tones can create a more fashionable appearance while retaining the recognizable skeleton features.
The key is to keep the skeletal structure visible underneath the decorative elements.
Realistic Skeleton Makeup
If you want a more realistic skull, focus on shadows rather than simply using more black paint.
Study the natural structure of the face and emphasize areas corresponding to:
- Eye sockets
- Nose cavity
- Cheekbones
- Jaw
- Temples
- Teeth
Use multiple shades instead of relying entirely on pure black. Gray, charcoal, white, and subtle transitions can create more convincing depth.
A realistic skeleton look takes more time because small details and careful blending matter.
Skeleton Makeup Ideas for Different Occasions
Halloween
Go bold with a full-face skull, cracked bones, dark eyes, and neck details.
Costume Party
A half-skull design can be easier to wear while still making a strong statement.
Photoshoot
Use stronger contrast and detailed shading because camera lighting can reduce subtle makeup effects.
Cosplay
Match your skeleton makeup to the character’s costume, hairstyle, and color palette.
Kids’ Face Painting
Keep the design simpler and use products specifically intended for children’s skin and face painting. Avoid complicated areas around the eyes and follow all product safety instructions.
Common Skeleton Makeup Mistakes
Making the Black Areas Too Heavy
Too much black can make the design look flat. Add depth with gray and careful blending.
Ignoring the Natural Face Shape
Use your actual cheekbones, nose, and jaw as guides instead of drawing completely random shapes.
Making the Teeth Too Large
Small, evenly spaced lines usually create a more recognizable skeletal mouth.
Forgetting the Neck
If your neck is visible, extending some skeletal details can make the transformation look more complete.
Skipping Setting
If the makeup will be worn for several hours, setting it can help reduce smudging and transfer.
Using Non-Cosmetic Paint
Never use craft paint or products that are not intended for skin. The FDA specifically advises against putting non-skin products on the face.
Skeleton Makeup Safety Tips
Face painting should be fun, but skin and eye safety still matter.
Always read the product label and follow its intended use. If a product says it should not be used around the eyes, do not use it there even if you see other people doing so.
Also consider these precautions:
- Do not use expired or contaminated makeup.
- Do not share makeup directly between people.
- Use clean brushes and sponges.
- Avoid products that cause burning or irritation.
- Keep face paint away from the eyes unless specifically approved for that area.
- Remove the makeup gently after the event.
- Stop using a product if you develop irritation.
When painting multiple people, using a clean sponge for each face is an important hygiene practice. (gathered.how)
How to Remove Skeleton Makeup
Removal is just as important as application.
Begin by gently loosening the makeup with a suitable makeup remover or cleansing product. Avoid aggressively scrubbing the skin, especially around the eyes.
After removing the majority of the face paint, cleanse the skin and follow with a gentle moisturizer if needed.
If a particular product is difficult to remove, follow the manufacturer’s removal instructions rather than repeatedly rubbing the skin.
Final Thoughts
Skeleton makeup is a creative way to turn a simple costume into a memorable look. The classic combination of white face paint, dark eye sockets, cheekbone shadows, a skeletal nose, and detailed teeth provides a strong foundation, while gray shading, cracks, glitter, and colorful accents can make the design completely your own.
Beginners should start with simple shapes and gradually build detail. Focus on blending, symmetry, and using the natural structure of your face as a guide. Most importantly, use only products designed for cosmetic use and pay particular attention to safety around the eyes.
Whether you choose an easy full-face skull, a glamorous half-skeleton, or an advanced realistic design, patience and practice are what turn basic face paint into impressive skeleton makeup.
FAQs About Skeleton Makeup
1. What makeup do I need for skeleton makeup?
The basic kit includes white and black face paint, black eyeliner, gray or black eyeshadow, makeup brushes, a sponge, and a setting product. Additional glitter or colored makeup can be used for creative designs.
2. Is skeleton makeup difficult for beginners?
A basic skeleton look is relatively beginner-friendly. Start with the white base, black eye sockets, nose, cheekbones, and teeth before attempting complicated details.
3. Can I use regular makeup instead of face paint?
You can use cosmetic products such as black eyeliner and eyeshadow for some parts of the design, but a dedicated cosmetic face paint can make a full skeleton look easier to create.
4. Can I use craft paint for skeleton makeup?
No. Products that are not intended for use on skin should not be applied to the face. Use cosmetics or face paints specifically labeled for skin use.
5. How do I make skeleton makeup look realistic?
Use your natural facial structure as a guide and create depth with black, gray, and white rather than relying only on solid black lines. Careful blending around the cheekbones, eyes, nose, and jaw can make the design more dimensional.
6. How do I make skeleton teeth look even?
Start at the center of the mouth and work outward. Draw the horizontal mouth line first, then add small vertical lines at relatively equal distances.
7. How long does skeleton makeup take?
A simple look may take around 20 to 30 minutes, while a detailed half-skull or realistic design can take much longer depending on your experience and the level of detail.
8. How can I stop skeleton makeup from smudging?
Allow each layer to settle, use appropriate setting powder or setting spray, and avoid touching your face. Professional tutorials commonly recommend setting the finished cream makeup with translucent powder.
9. Can children wear skeleton makeup?
Yes, but use products specifically intended for children’s face painting and follow the label directions carefully. Keep products away from the eyes and stop immediately if irritation occurs.
10. What is the easiest skeleton makeup style?
A simple black-and-white skull is usually the easiest option. Apply a white base, darken the eye sockets and nose, shade the cheekbones, and finish with a skeletal tooth pattern around the mouth.