Makeup Tutorial: Step-by-Step Guide for Beginners and Techniques
Introduction
Learning makeup can feel confusing when you are faced with foundation, concealer, blush, bronzer, eyeshadow, eyeliner, mascara, lipstick, and countless brushes. The good news is that you do not need a huge collection of products or professional skills to create a beautiful look. A simple makeup tutorial can help you understand what to apply, when to apply it, and how to blend everything naturally.
The secret to good makeup is not using the most products. It is preparing the skin properly, choosing suitable shades and textures, applying thin layers, and understanding how each product works. A beginner-friendly routine can be as simple as skin preparation, a light base, concealer, brows, mascara, blush, and lip color.
Whether you want natural everyday makeup, soft glam, party makeup, or a more polished full-face look, the basic techniques remain surprisingly similar. This guide walks you through the process from start to finish.
What Do You Need for a Basic Makeup Routine?
Before beginning, gather the products you actually need. You do not have to purchase everything at once.
A basic makeup kit can include:
- Moisturizer
- Sunscreen for daytime
- Primer
- Foundation or skin tint
- Concealer
- Setting powder
- Blush
- Bronzer
- Highlighter
- Brow pencil or brow gel
- Eyeshadow
- Eyeliner
- Mascara
- Lip liner
- Lipstick or gloss
- Setting spray
Useful tools include a makeup sponge, foundation brush, powder brush, blush brush, and a few eyeshadow brushes.
For a beginner, even fewer products can be enough. You can create a simple everyday appearance with moisturizer, concealer, blush, mascara, and a lip product.
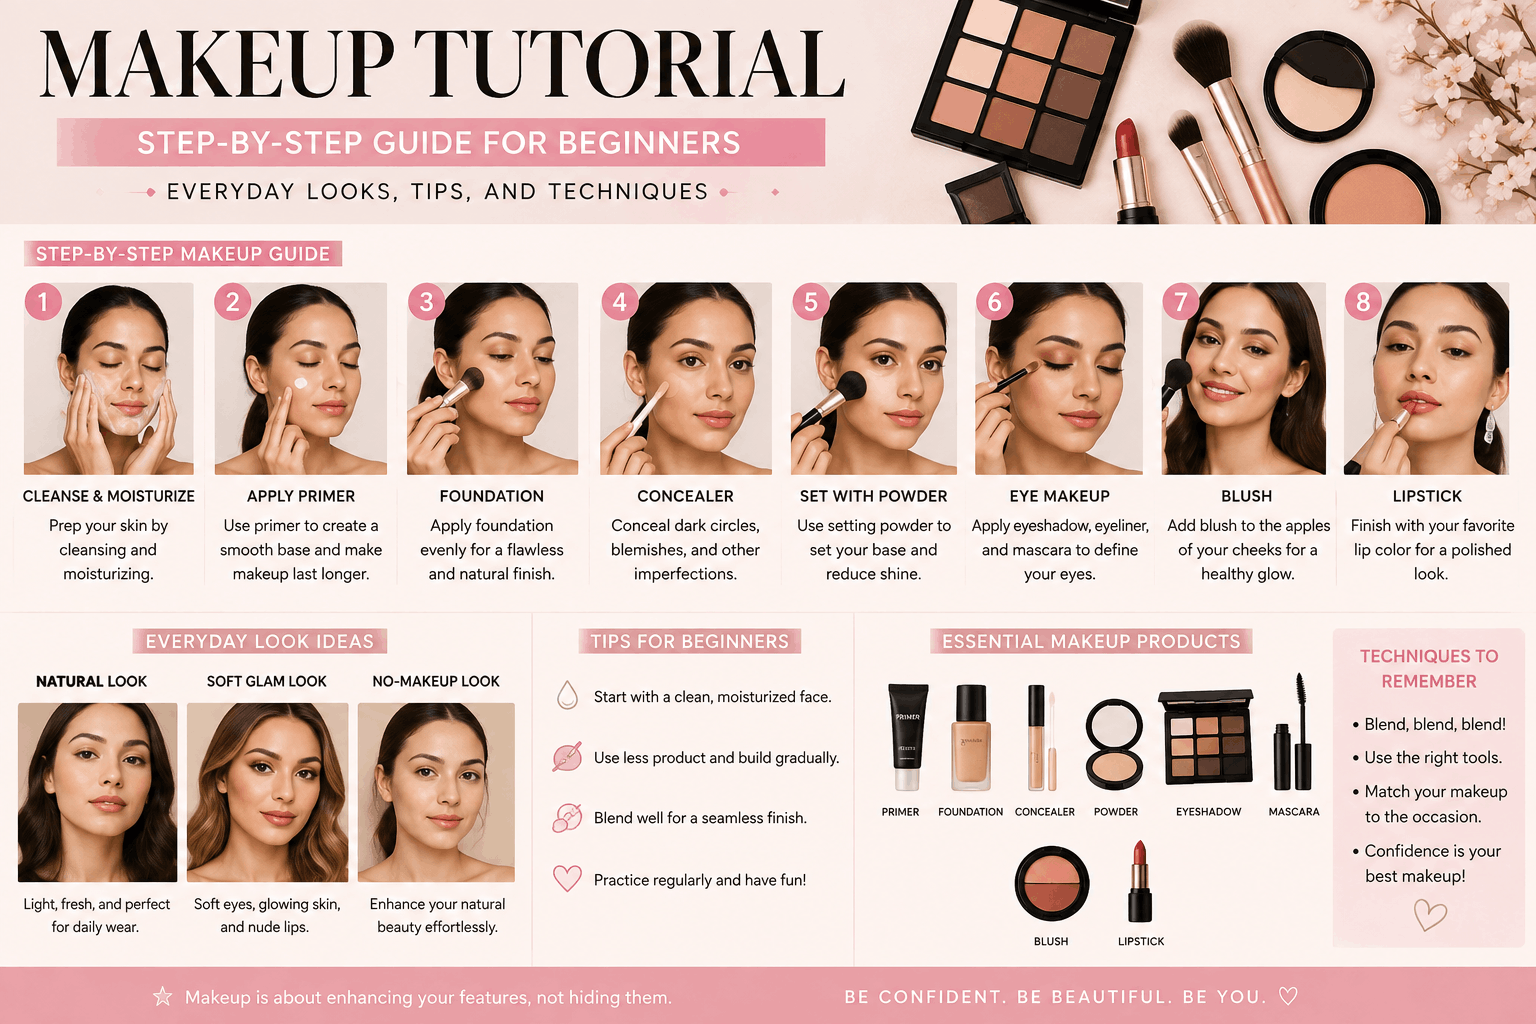
Step 1: Prepare Your Skin
Good makeup starts before you apply makeup.
Begin with clean skin, followed by a moisturizer appropriate for your skin type. During the daytime, sunscreen should be the final step of your skincare routine before makeup.
Allow your skincare products to settle before starting your makeup. This can help reduce pilling and gives your makeup a smoother surface.
Why Skin Preparation Matters
If your skin is extremely dry, foundation can emphasize flaky areas. If your skin is very oily, makeup may move or become shiny more quickly.
The goal is not to make your skin completely different. Instead, create a comfortable, balanced base so makeup can sit more evenly.
Step 2: Apply Primer
Primer is optional, but it can be useful depending on your skin and the finish you want.
Different primers can have different purposes. Some are designed to provide hydration, while others help control shine or create a smoother-looking surface.
Apply a small amount rather than covering your face with a thick layer. Give it a moment to settle before moving on.
If your foundation already works well without primer, there is no need to force this step into your routine.
Step 3: Apply Foundation or Skin Tint
Foundation helps even out the appearance of your complexion.
Start with a small amount and apply it mainly where you want coverage. You can then build additional coverage instead of applying a heavy layer everywhere.
A damp makeup sponge can create a soft finish, while a brush can provide more coverage depending on the technique and formula.
Choosing the Right Foundation Shade
Your foundation should blend naturally with your skin rather than making your face significantly lighter or darker.
When testing a shade, consider both your skin depth and undertone. Undertones are commonly described as:
- Warm
- Cool
- Neutral
A shade that matches your depth but has the wrong undertone may still look unnatural.
Step 4: Apply Concealer
Concealer can be used to add extra coverage where foundation does not provide enough.
Common areas include:
- Under the eyes
- Around the nose
- Over blemishes
- Areas of discoloration
- Center of the face
You do not necessarily need a thick layer under the eyes. Start with a small amount and blend it carefully.
For blemishes, placing a small amount directly on the area can provide more precise coverage than spreading concealer across a large section of the face.
Step 5: Set the Base With Powder
Powder helps reduce unwanted shine and can improve the wear of certain makeup products.
You do not always need powder over your entire face.
If your skin is dry, you may prefer applying powder only where necessary. If your skin becomes oily quickly, you may want more strategic powder application around areas such as the forehead, nose, and chin.
The objective is to set the makeup without making your complexion look unnecessarily heavy.
Step 6: Shape Your Brows
Brows can dramatically change the appearance of your face, but they do not need to be perfectly identical.
Use a brow pencil, powder, or gel to fill sparse areas. Keep the front of the brows softer and gradually build definition toward the tail.
A brow gel can help hold the hairs in place and create a groomed appearance.
For beginners, avoid drawing a very dark, solid shape. Light, hair-like strokes generally create a more natural result.
Step 7: Apply Eyeshadow
Eyeshadow gives you an opportunity to personalize your makeup.
For a simple everyday eye look, you can use three shades:
- A light shade
- A medium transition shade
- A deeper shade for definition
Apply the medium shade through the crease and blend it well. Add the darker shade toward the outer corner if you want more depth.
For a natural look, neutral shades such as beige, brown, taupe, bronze, or soft peach are easy to work with.
Beginner Eyeshadow Tip
The biggest mistake beginners make is using too much product at once.
Pick up a small amount of eyeshadow, tap off excess, and build the intensity gradually. It is much easier to add color than to remove too much.
Step 8: Apply Eyeliner
Eyeliner can define the eyes and make the lashes appear fuller.
If you are new to eyeliner, start with a small line close to the upper lash line instead of trying to create a dramatic wing immediately.
You can also use a brown eyeliner for a softer daytime appearance.
For evening makeup, black liner and a more defined wing can create a stronger effect.
Remember that eyeliner does not have to be perfectly identical on both eyes. Concentrate on creating balanced shapes rather than chasing absolute symmetry.
Step 9: Apply Mascara
Mascara is one of the easiest ways to make the eyes look more defined.
Place the wand near the roots of your upper lashes and move it gently toward the tips. Apply another light coat if additional volume or length is needed.
Avoid repeatedly adding layers while the mascara is becoming dry, because this can increase the chance of clumping.
For a softer appearance, brown mascara can also be an option.
Step 10: Add Bronzer
Bronzer adds warmth to the complexion.
Instead of using a very dark shade, choose a color that complements your skin tone.
Common placement areas include:
- Upper forehead
- Cheek area
- Along the jawline
- Sides of the face
Blend carefully so there are no obvious lines.
Bronzer is different from contour. Bronzer generally adds warmth, while contour is designed to create the appearance of shadow and structure.
Step 11: Apply Blush
Blush brings color and freshness to the face.
Depending on the look you want, you can apply it to the apples of the cheeks or blend it slightly upward toward the temples.
Popular blush colors include:
- Pink
- Peach
- Rose
- Mauve
- Coral
- Berry
Cream and liquid blushes can provide a fresh, skin-like appearance, while powder blush can be convenient for building and setting color.
Current beauty trends also continue to emphasize fresh, natural-looking flushed cheeks and effortless makeup rather than overly complicated application.
Step 12: Add Highlighter
Highlighter is optional but can give the skin a luminous appearance.
Apply a small amount to areas where light naturally hits, such as:
- Tops of the cheekbones
- Bridge of the nose
- Inner corners of the eyes
- Cupid’s bow
Avoid applying too much highlighter to textured areas if you want a smoother-looking finish, because intense shine can make texture more noticeable.
Step 13: Define the Lips
Start by moisturizing your lips if they feel dry.
For more definition, use a lip liner close to your natural lip color or to your chosen lipstick shade.
Then apply:
- Lipstick for stronger color
- Lip gloss for shine
- Lip tint for a lighter effect
- Lip balm for minimal makeup
For everyday makeup, a nude, pink, peach, mauve, or soft brown shade can be easy to wear.
Step 14: Finish With Setting Spray
Setting spray can be the final step of your routine. Depending on the formula, it may help reduce the powdery appearance of makeup and support longer wear.
Hold it at a reasonable distance and apply a light mist rather than soaking the face.
A setting product is optional for a very simple routine, but it can be useful when you want your makeup to remain polished for longer.
Easy Everyday Makeup Tutorial for Beginners
If you do not want a full-face routine every morning, try this shorter version:
- Moisturizer and sunscreen
- Skin tint or foundation
- Concealer
- Brow gel
- Mascara
- Blush
- Lip balm, tint, or gloss
- Light powder or setting spray if needed
This routine takes less time while still adding definition and color.
In fact, a shorter routine can be easier to maintain than a complicated one. Beginner makeup guides commonly recommend starting with a manageable routine and adding products as your skills improve.
Makeup Tutorial for a Natural Look
Natural makeup is less about using no makeup and more about using products subtly.
Choose lightweight base products and avoid applying excessive coverage everywhere.
A natural routine can include:
- Light foundation or skin tint
- Small amount of concealer
- Soft brow definition
- Neutral eyeshadow
- Mascara
- Cream blush
- Natural lip color
Blend everything thoroughly and keep the intensity balanced.
The goal is to enhance your features rather than completely hide them.
Makeup Tutorial for a Soft Glam Look
Soft glam is slightly more polished than everyday makeup while still maintaining a blended appearance.
Try:
- Medium-coverage foundation
- Concealer
- Soft contour
- Warm bronzer
- Rose or peach blush
- Neutral eyeshadow
- Soft eyeliner
- Mascara or lashes
- Defined brows
- Lip liner
- Nude or pink lipstick
- Subtle highlighter
The key to soft glam is blending. Harsh lines can make the makeup appear heavier than intended.
Common Makeup Mistakes Beginners Should Avoid
Using Too Much Foundation
More foundation does not automatically create better coverage. Build coverage gradually.
Choosing the Wrong Shade
A foundation that does not match your skin can make the entire makeup look unnatural.
Skipping Skin Preparation
Dry or excessively oily skin can make application more difficult.
Poor Blending
Unblended foundation, blush, contour, or eyeshadow can create visible edges.
Applying Too Much Powder
Heavy powder can make the complexion look dry or cakey.
Overdoing Eyebrows
Extremely dark or sharply outlined brows can overpower the rest of the face.
Using Too Much Blush
Blush should complement the complexion rather than become the only thing people notice.
Forgetting Makeup Hygiene
Keep brushes and sponges clean, and avoid sharing personal makeup products. Dirty tools can accumulate oils, product residue, and microorganisms.
Should You Apply Eyeshadow Before Foundation?
There is no single rule that works for every makeup style.
For everyday beginner makeup, many routines place foundation and concealer before eye makeup. However, if you are creating a dramatic eye look with dark or glittery eyeshadow, applying eye makeup first can make it easier to clean up fallout before finishing the complexion. Professional makeup guidance also recognizes that the order can change depending on the look. (Allure)
So choose the method that makes the process easier for you.
How to Make Makeup Look More Natural
A natural-looking finish usually comes from restraint rather than adding more products.
Try these simple techniques:
- Apply thin layers.
- Blend cream products thoroughly.
- Choose shades close to your natural coloring.
- Avoid excessive powder.
- Use blush gradually.
- Keep brow fronts softer.
- Match your foundation carefully.
- Check your makeup in natural light.
- Remove obvious edges with a clean sponge or brush.
Remember that skin texture is normal. Perfectly smooth-looking skin in photos often involves lighting, camera settings, editing, or filters.
Final Thoughts
A good makeup tutorial should make makeup feel easier, not more complicated. Once you understand the basic order—skin preparation, base, concealer, definition, color, lips, and setting—you can create countless looks without needing an enormous makeup collection.
Start with a simple everyday routine and practice one technique at a time. Learn how much foundation your skin actually needs, experiment with blush placement, practice blending eyeshadow, and discover which colors make you feel confident.
Makeup is ultimately a creative tool. There are guidelines that help, but there is no requirement to follow every trend or use every product. The best routine is one that suits your skin, lifestyle, time, and personal style.
FAQs About Makeup Tutorial
1. What is the correct order for applying makeup?
A common beginner-friendly order is skincare and sunscreen, primer if desired, foundation or skin tint, concealer, powder if needed, brows, eyeshadow, eyeliner, mascara, bronzer, blush, highlighter, lip products, and setting spray. The exact order can change depending on the look.
2. What makeup should a beginner buy first?
Start with a moisturizer, sunscreen, foundation or skin tint, concealer, blush, brow product, mascara, and lip product. Add eyeshadow, eyeliner, bronzer, and highlighter as you become more comfortable.
3. Do I need primer before foundation?
No. Primer is optional. If your foundation already applies smoothly and wears well without it, you may not need an additional primer.
4. Should foundation be lighter or darker than your skin?
Ideally, your foundation should closely match your natural skin depth and undertone rather than deliberately being much lighter or darker.
5. How can I stop foundation from looking cakey?
Use thin layers, avoid applying excessive powder, prepare your skin properly, and blend thoroughly. Adding more foundation to fix uneven coverage can sometimes make the problem worse.
6. Should beginners use liquid or powder foundation?
Either can work. Choose based on your skin type, desired coverage, finish, and comfort with application. A lightweight liquid or skin tint can be an easy starting point.
7. How do I make my makeup last longer?
Prepare your skin, allow skincare to settle, use suitable base products, apply thin layers, set areas that need it with powder, and consider a setting spray.
8. How can I make my eyes look bigger with makeup?
Curling the lashes, applying mascara, using a lighter shade near the inner eye, and softly defining the outer corner can help create a more open appearance.
9. How much blush should I use?
Start with a small amount and build gradually. It is easier to add blush than to remove excessive color.
10. How long does it take to learn makeup?
Basic makeup techniques can be learned relatively quickly, but becoming highly skilled takes practice. Start with a simple routine and practice blending, shade matching, and product placement regularly.