
Glute Bridges: Benefits, Proper Form, Variations & Complete Guide
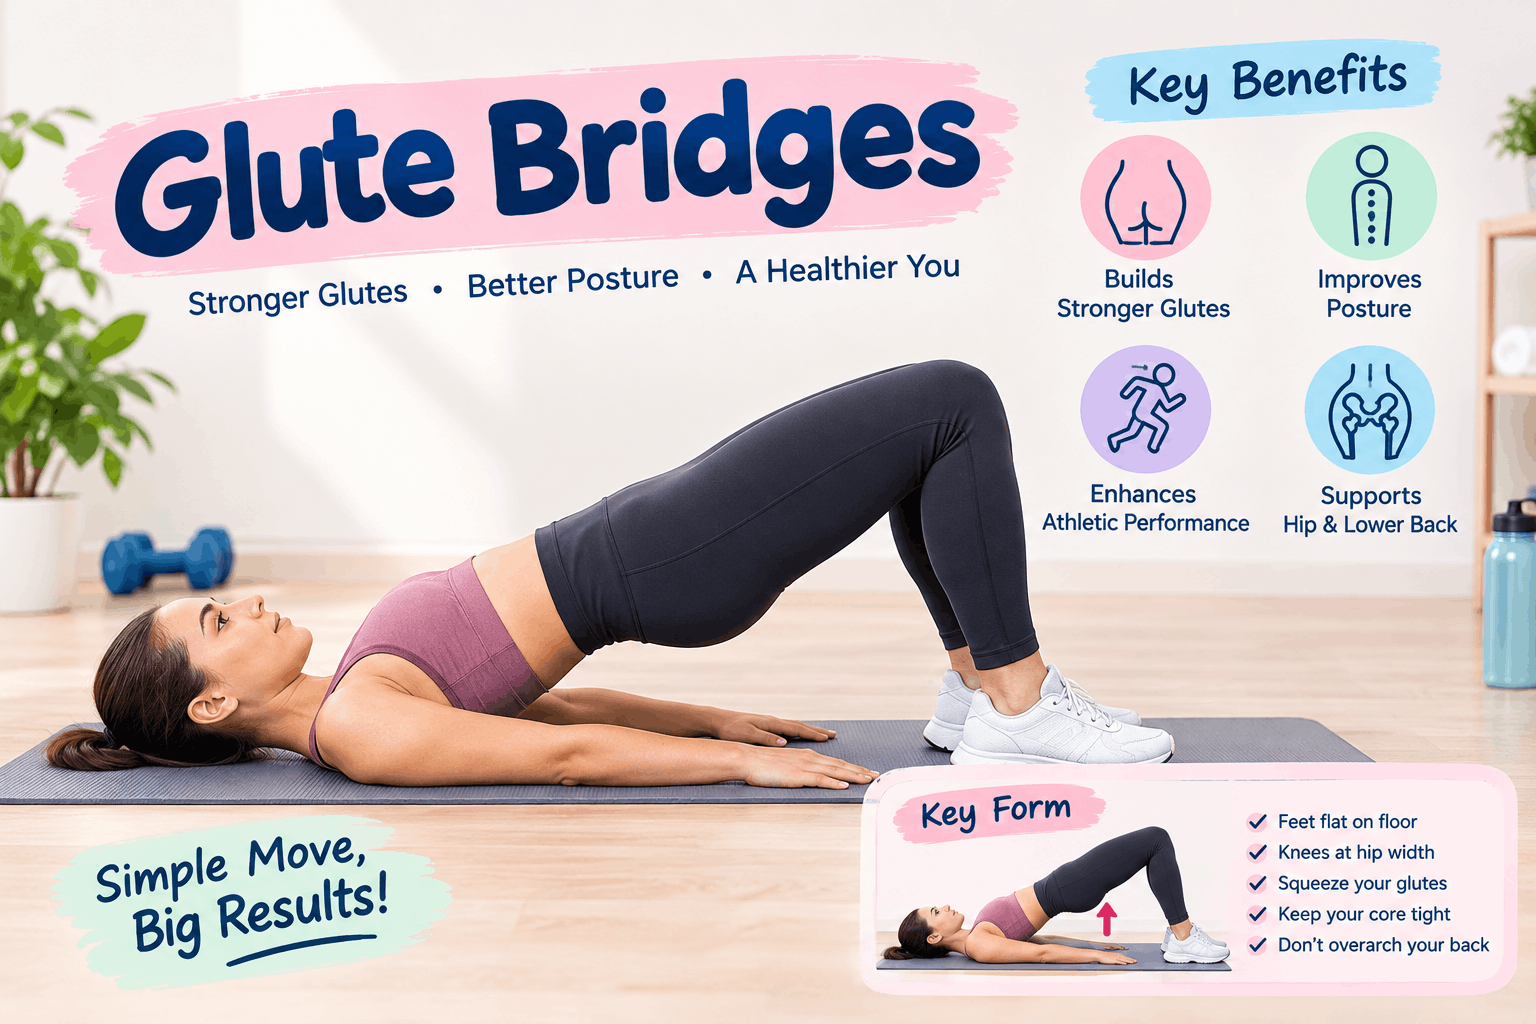
Glute bridges are a simple but effective lower-body exercise that can strengthen the glutes, hamstrings and core without requiring a gym or complicated equipment. Because the movement is performed while lying on your back, it is also an accessible option for beginners who want to build lower-body strength and improve hip control.
The basic exercise involves bending the knees, placing the feet on the floor and lifting the hips while squeezing the glute muscles. As strength improves, you can make the movement more challenging with resistance bands, weights, marching or single-leg variations.
What Are Glute Bridges?
A glute bridge is a bodyweight resistance exercise performed from a lying position. You start with your back on the floor, knees bent and feet planted. From there, you drive through your feet and raise your hips until your body forms a relatively straight line from your shoulders toward your knees.
The primary muscles involved are the gluteal muscles, while the hamstrings, core and lower-back muscles also contribute to the movement.
Unlike exercises that require heavy equipment, glute bridges can be performed at home with very little space.
Benefits of Glute Bridges
1. Strengthen the Glutes
The main purpose of the exercise is to train the glute muscles. Strong glutes contribute to movements such as walking, climbing stairs, standing up and running.
2. Work the Hamstrings
The hamstrings assist with hip extension during the bridge. This makes the movement useful as part of a broader lower-body strengthening routine.
3. Support Hip Stability
Stronger glutes can contribute to better control and stability around the hips and pelvis. This is particularly useful when performing other lower-body movements.
4. Engage the Core
Although glute bridges are primarily a hip-extension exercise, maintaining a stable trunk requires abdominal and core engagement.
5. Require Minimal Equipment
The standard version requires nothing more than a comfortable surface. A resistance band, dumbbell or other appropriate weight can be added later to increase difficulty.
6. Convenient for Home Workouts
Because you do not need much space or equipment, glute bridges can easily fit into home workouts, warm-ups or lower-body strength sessions.
7. Easy to Progress
Beginners can start with regular bridges and gradually move toward resistance-band, marching, weighted or single-leg versions.
How to Do a Glute Bridge Correctly
Good technique is more important than simply lifting your hips as high as possible.
Step-by-Step Instructions
- Lie on your back on a comfortable surface.
- Bend your knees and place both feet flat on the floor.
- Position your feet approximately hip-width apart.
- Keep your arms comfortably beside your body.
- Brace your core gently while continuing to breathe.
- Squeeze your glutes.
- Push through your feet and raise your hips from the floor.
- Stop when your body reaches a comfortable straight-line position from your shoulders toward your knees.
- Hold briefly while maintaining the contraction.
- Lower your hips slowly and with control.
- Repeat for your desired number of repetitions.
Cleveland Clinic recommends controlled movement and suggests two sets of 15 repetitions as one practical starting point, although the appropriate amount depends on your fitness level and goals.
How High Should You Lift Your Hips?
Higher is not necessarily better.
Your goal should be to raise your hips while keeping your spine controlled and your glutes doing the work. Excessively arching the lower back to achieve more height can reduce the quality of the movement.
Focus on hip extension rather than maximum height. If your back begins to feel uncomfortable, lower the range of motion and reassess your technique.
Glute Bridge Variations
Once the basic movement becomes comfortable, variations can increase the challenge or change the training stimulus.
1. Basic Glute Bridge
This is the standard beginner-friendly version. It is an excellent starting point for learning the movement and developing glute activation.
2. Resistance Band Glute Bridge
Place a resistance band around your thighs, generally above the knees. As you lift your hips, gently press your knees outward against the band’s resistance.
This adds an additional challenge while encouraging control of the hips and knees.
3. Single-Leg Glute Bridge
The single-leg version increases the demand on one side at a time.
To perform it, keep one foot planted while extending the opposite leg. Lift the hips using the planted leg while attempting to keep the pelvis level.
This variation requires more strength and stability, so it is better suited to people who have mastered the basic bridge.
4. Marching Glute Bridge
Begin in the normal bridge position. While keeping your hips elevated, slowly lift one foot and then the other, creating a controlled marching movement.
The challenge is to keep the pelvis stable rather than allowing it to shift from side to side.
5. Weighted Glute Bridge
A dumbbell or other suitable weight can be positioned across the hips to increase resistance.
Start with a manageable load and make sure the weight is positioned comfortably and securely. Do not add resistance until you can perform the bodyweight version with good technique.
6. Elevated Glute Bridge
Your feet can be placed on a stable elevated surface to change the movement and increase the challenge. This should only be attempted when you already have good control of the standard bridge.
7. Isometric Glute Bridge Hold
Instead of repeatedly raising and lowering your hips, lift into the bridge position and hold it.
Isometric bridge holds can be useful for practicing glute contraction and maintaining positional control.
Common Glute Bridge Mistakes
Arching the Lower Back
One of the most common mistakes is using the lower back to lift the hips rather than allowing the glutes to perform most of the work.
Keep your trunk controlled and avoid forcing your hips excessively high.
Moving Too Quickly
Fast repetitions can make it difficult to maintain proper control.
A slower lift and controlled lowering phase can help you focus on the intended muscles.
Placing the Feet Too Far Away
If your feet are positioned excessively far from your body, the exercise may feel very different and can increase the contribution from other muscles.
Experiment with foot placement while maintaining comfortable technique.
Letting the Knees Collapse
Your knees should remain controlled throughout the movement. Avoid allowing them to collapse inward.
Holding Your Breath
Remember to breathe throughout the exercise instead of holding your breath during every repetition.
Chasing Repetition Numbers
More repetitions are not automatically better. Once technique starts deteriorating, it is generally better to stop, rest and reset.
ACE recommends progressing exercises while maintaining movement quality rather than continuing after form has broken down.
Glute Bridges for Beginners
If you are new to exercise, start with the basic bodyweight version.
A simple approach could be:
- 1–2 sets
- 8–15 controlled repetitions
- Rest between sets
- Practice two or three times per week as part of a broader strength routine
The exact number should be adjusted according to your fitness level, recovery and overall workout plan. Cleveland Clinic’s exercise guidance similarly emphasizes starting with manageable repetitions and progressing as strength improves.
How to Make Glute Bridges Harder
When regular bridges become easy, you can progress by:
- Adding a resistance band
- Increasing repetitions gradually
- Adding a short hold at the top
- Using marching bridges
- Moving to single-leg bridges
- Adding appropriate external resistance
- Combining bridges with other lower-body exercises
Progressive resistance is useful because muscles need an increasing challenge to continue adapting. Resistance training can improve strength, muscular endurance and muscle development.
Glute Bridges vs. Hip Thrusts
Glute bridges and hip thrusts share a similar hip-extension pattern, but the setup differs.
A traditional glute bridge is usually performed with your upper back on the floor. A hip thrust generally positions the upper back against a bench or another stable elevated surface.
Both can be used in lower-body strength programs, but the best choice depends on your training experience, available equipment and goals.
Can Glute Bridges Build Your Glutes?
Yes, glute bridges can contribute to glute strength and muscle development, particularly when they are performed consistently and progressed over time.
However, doing hundreds of repetitions does not automatically produce bigger glutes. Muscle development depends on factors including training stimulus, progressive resistance, nutrition, recovery and individual genetics.
For greater strength and muscle growth, glute bridges can be combined with other lower-body exercises rather than used as the only exercise in a workout.
Can Glute Bridges Help With Lower-Back Strength?
Glute bridges involve the glutes, hamstrings and core, and they can help develop strength around the hips and trunk. However, they should not be considered a universal treatment for back pain.
If a bridge causes or increases pain, stop the exercise and consider getting guidance from a qualified healthcare professional or physical therapist. Cleveland Clinic specifically recommends adjusting the movement if back discomfort occurs.
When Should You Do Glute Bridges?
Glute bridges can fit into several types of workouts.
As a Warm-Up
A few controlled bodyweight bridges can help you prepare for a lower-body session.
During Strength Training
You can use them as one exercise within a glute or lower-body workout.
At Home
They are especially convenient when you have no gym equipment.
During a Core Workout
Because the movement requires trunk stability, bridges can also complement other core exercises.
Safety Tips
Glute bridges are generally accessible, but proper technique still matters.
Keep these points in mind:
- Use a stable surface.
- Start without additional weight.
- Move slowly and deliberately.
- Do not force excessive hip height.
- Keep your knees controlled.
- Continue breathing.
- Stop if you experience sharp or unusual pain.
- Progress resistance gradually.
- If you have an existing injury or medical condition, seek appropriate professional guidance before starting a new exercise program.
Conclusion
Glute bridges are a practical lower-body exercise for strengthening the glutes while also involving the hamstrings and core. Their biggest advantages are simplicity, minimal equipment requirements and the ability to modify the movement as your strength improves.
Start with the basic bridge and prioritize controlled movement over speed or height. Once your technique becomes consistent, resistance bands, marching bridges, single-leg variations and appropriate weights can make the exercise progressively more challenging.
For the best results, treat glute bridges as one part of a balanced strength program rather than relying on them alone. Consistent training, gradual progression and good form are more important than simply performing a high number of repetitions.
Frequently Asked Questions
1. What are glute bridges good for?
Glute bridges primarily strengthen the glutes while also engaging the hamstrings and core. They can support lower-body strength and hip stability.
2. How many glute bridges should I do a day?
There is no universal daily number. Beginners can start with around 1–2 sets of 8–15 controlled repetitions and gradually increase the challenge.
3. Can glute bridges grow your butt?
They can contribute to stronger and more developed glute muscles when combined with progressive resistance training, adequate nutrition and recovery.
4. Are glute bridges good for beginners?
Yes. The basic bodyweight version is relatively simple and requires little equipment, making it suitable for many beginners.
5. Do glute bridges work the hamstrings?
Yes. The hamstrings assist during the hip-extension movement, although the glutes are the primary focus.
6. Are glute bridges better than squats?
Neither exercise is universally better. They train the lower body differently and can complement each other in a balanced workout.
7. Why do I feel glute bridges in my hamstrings?
Your hamstrings naturally contribute to the movement. If they dominate or cramp, adjusting foot position and focusing on controlled glute contraction may help.
8. Can I do glute bridges every day?
Some people can tolerate light bodyweight bridges frequently, but muscles also need recovery, especially when resistance or high training volume is involved. A structured strength routine is generally preferable to automatically training the same muscles hard every day.
9. What is the hardest glute bridge variation?
Single-leg bridges, weighted bridges and other advanced variations can substantially increase the challenge. The most difficult option depends on your strength and technique.
10. Should glute bridges hurt?
You may feel your muscles working or becoming fatigued, but sharp or unusual pain is not something to push through. Stop and reassess your technique, and seek professional advice if pain persists.
Meta Description:
Glute bridges strengthen the glutes, hamstrings and core. Learn proper form, key benefits, effective variations, mistakes to avoid and workout tips.