Polygel Nail Kit: Guide and Everything Beginners Should Know
Introduction
Beautiful, well-shaped nails can make any manicure look more polished, and modern nail enhancement products have made salon-inspired styles easier to achieve at home. A polygel nail kit is a popular choice for people who want durable, attractive nails without working with traditional acrylic systems. It typically includes a polygel tube or pot, a brush, shaping tools, and other essentials needed to create a smooth manicure.
Polygel combines characteristics of acrylic and hard-gel nail enhancements. Its thick, putty-like consistency makes it easier to control during application, while a compatible UV or LED lamp hardens the product. With the right preparation, careful shaping, and proper curing, beginners can work toward a professional-looking finish.
However, good results depend on more than choosing a kit. Understanding the tools, application process, maintenance requirements, and safety precautions can help you avoid common mistakes and protect your natural nails.
What Is a Polygel Nail Kit?
A polygel nail kit is a collection of products and tools used to strengthen natural nails or create artificial nail extensions. The main ingredient is a sculptable nail enhancement product that remains workable until it is cured under a compatible lamp.
Unlike traditional acrylic systems, which generally require liquid monomer and powder, polygel is usually supplied in a premixed tube or container. It has a thicker consistency than many nail gels, allowing users to shape it without the product flowing quickly toward the cuticles.
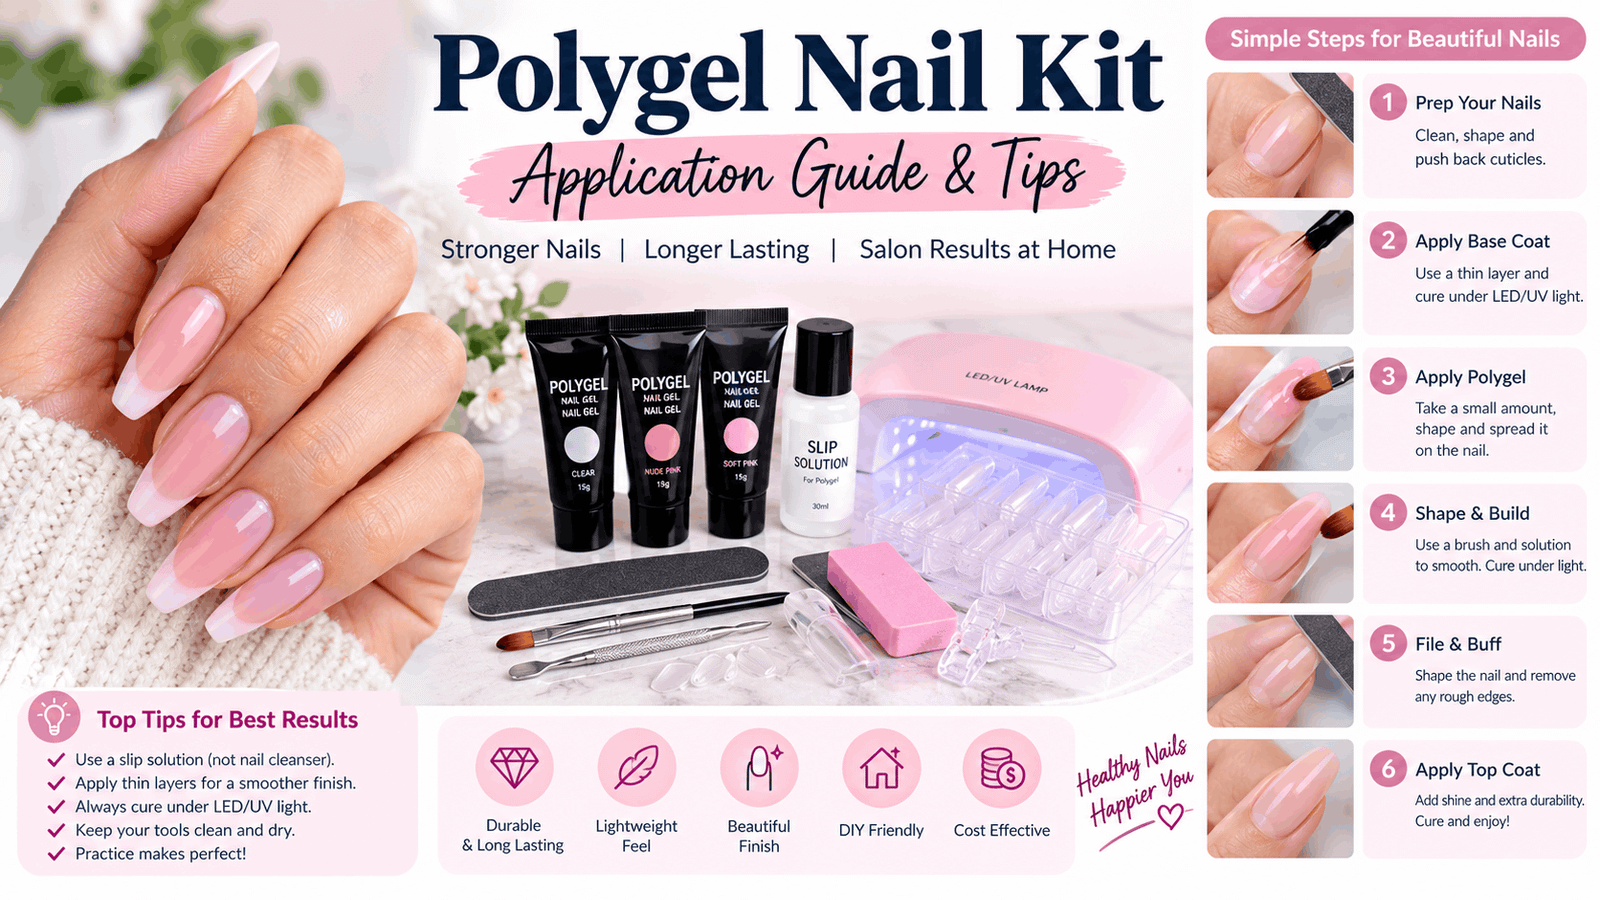
Depending on the manufacturer, a kit may include:
- Polygel in one or several shades
- A UV or LED nail lamp
- A dual-ended brush and spatula
- Dual nail forms or extension tips
- Base coat and top coat
- Slip solution for shaping
- Nail files and buffers
- A cuticle pusher
- Nail cleanser and preparation products
- Decorative accessories or instructions
Not every kit contains all these items. Before purchasing one, check the product description and confirm that the lamp, gel, and other components are compatible.
Benefits of Using Polygel for Nail Enhancements
1. Easy-to-control consistency
Polygel has a thick texture that generally stays where it is placed. This gives beginners more time to shape the product before curing and can make it easier to create a balanced nail structure.
2. Natural-looking results
When applied in an appropriate thickness and shape, polygel can create smooth extensions or a subtle overlay on natural nails. Clear, nude, pink, and milky shades are especially useful for understated manicures.
3. Customizable nail length and shape
Users can create short square nails, rounded tips, almond shapes, or longer extensions. The final appearance depends on the chosen forms, the amount of product, and filing technique.
4. Suitable for different nail designs
Once the enhancement has been properly cured and shaped, compatible nail polish, gel colors, and decorative designs can be added. Popular choices include French tips, ombré finishes, glitter accents, and minimalist nail art.
5. Potentially long-lasting wear
A correctly applied set may last around two to three weeks, although some applications last longer or shorter. Wear time depends on nail growth, preparation, product quality, daily activities, and how carefully the nails are maintained.
Polygel does not automatically make natural nails healthier or stronger. It provides an artificial enhancement, and improper application or removal can leave the underlying nails thin, brittle, or damaged.
How to Choose the Best Polygel Nail Kit
Choosing the right set can make application easier and reduce the likelihood of disappointing results.
Check the product ingredients and instructions
Purchase products from a reputable manufacturer that provides ingredient information, clear directions, curing requirements, and removal instructions. Avoid kits with missing labels or vague safety information.
Choose a compatible curing lamp
The lamp must be suitable for the specific formulation. A lamp that appears powerful or has a high wattage does not necessarily cure every product correctly. Follow the manufacturer’s recommended lamp type and curing time.
Incomplete curing can leave residual chemicals in the product and increase the risk of allergic reactions.
Look for useful beginner tools
A practical starter set should contain a suitable shaping brush, a spatula, nail files, and the necessary forms or tips. A well-explained instruction manual can also be valuable when learning the process.
Consider the shade selection
Clear polygel is versatile for overlays and extensions. Nude and pink shades create a natural appearance, while white can help with French-style designs. Beginners may prefer a small selection of neutral colors before purchasing larger collections.
Read the removal instructions
Some polygel systems require substantial filing, while removal methods vary by formulation. Do not assume that every product can be completely dissolved in acetone. Understanding the removal process before application can help you avoid damaging the natural nail later.
Essential Tools for Applying Polygel
Before starting, prepare a clean workspace with good ventilation. Depending on your kit, you may need the following:
- Nail file: Shapes the free edge and refines the enhancement.
- Buffer: Smooths minor surface irregularities.
- Nail cleanser: Removes surface residue when required by the system.
- Base coat: Helps the enhancement adhere when specified.
- Polygel: Creates the overlay or extension.
- Brush and spatula: Dispense, position, and shape the product.
- Slip solution: Helps the brush move across the product without excessive sticking.
- Dual forms or nail tips: Provide structure for extensions.
- Compatible UV or LED lamp: Cures the product according to its instructions.
- Top coat: Adds the desired finish and helps protect the surface.
- Cuticle oil: Moisturizes the skin surrounding the nails after the manicure.
Avoid substituting random liquids for the manufacturer’s recommended slip solution. Different formulations may behave differently, and unsuitable products can affect application or curing.
How to Apply Polygel Nails Step by Step
The precise method depends on whether you are creating an overlay, using dual forms, or applying extensions. The following steps describe a typical dual-form application. Always follow the instructions supplied with your particular system.
Step 1: Prepare your natural nails
Wash your hands and dry them thoroughly. Remove existing polish and gently shape the free edges. If the product instructions require cuticle preparation, work carefully without cutting living skin or forcefully pushing back the cuticles.
Remove surface dust and use the specified nail cleanser or preparation product. Avoid aggressive buffing because excessive filing can thin the natural nail.
Do not apply enhancements over nails that are painful, discolored, lifting, or showing signs of infection.
Step 2: Select the correct dual forms
Choose a form that fits the width of each nail from sidewall to sidewall. It should not pinch the nail, leave large gaps, or require excessive pressure.
Test the forms before dispensing the product. Using an unsuitable size can lead to uneven extensions, bulky sides, or weak areas.
Step 3: Apply the base coat if required
Some systems require a thin base coat or bonding layer. Apply only the recommended amount and cure it for the specified time.
Avoid allowing the base coat to touch the surrounding skin. If a product accidentally contacts the skin, remove it before curing according to the manufacturer’s safety directions.
Step 4: Dispense a small amount of polygel
Use the spatula or dispensing tool to place a manageable amount of product into the dual form. Beginners should start with less product because adding a little more is easier than correcting an overly thick application.
The amount required will vary according to the form size and the desired nail length.
Step 5: Shape the product
Moisten the designated brush with a small amount of slip solution if the manufacturer recommends it. Gently press and spread the polygel inside the form, creating an even layer.
Pay attention to the sidewalls, apex, and free edge. The apex is the slightly elevated structural area that helps distribute stress across the nail. The product should not be excessively thick at the tip or near the cuticle.
Step 6: Place the form onto the nail
Position the form carefully and press it into place without forcing the product onto the skin. Check the sidewalls and underside for excess material.
If product squeezes onto the surrounding skin, remove it completely before curing. Do not cure a layer of polygel against the skin.
Step 7: Cure the enhancement
Place the hand under the lamp and use the curing time specified by the product manufacturer. Make sure the lamp is compatible with the formula and that the nail is positioned correctly.
Do not guess the curing time or assume that a product is fully cured because the surface feels hard. If you are unsure whether your lamp and product are compatible, consult the manufacturer or a qualified nail professional.
Step 8: Remove the form and refine the shape
Once curing is complete, remove the dual form according to the kit instructions. Inspect the extension for uneven edges or excess material.
Use a suitable file to refine the shape, taking care not to file the natural nail. Avoid excessive filing around the cuticles and sidewalls.
Step 9: Apply the top coat
Remove dust and cleanse the surface if required. Apply a thin, even layer of compatible top coat and cure it as directed.
Some products leave a tacky inhibition layer after curing, while others do not. Cleanse the surface only when the product instructions call for it.
Step 10: Finish and moisturize
Apply cuticle oil around the nails and moisturize your hands. If you want additional color or nail art, use products that are compatible with your enhancement system.
Take your time during the first few applications. A simple, shorter nail shape is often easier to manage than a long extension.
Common Polygel Application Mistakes to Avoid
Applying too much product
Excess product can create bulky nails, uneven surfaces, and difficulty achieving a balanced shape. Use a moderate amount and distribute it evenly.
Allowing product to touch the skin
Repeated contact with uncured nail enhancement products can cause sensitization and allergic contact dermatitis. This can lead to itching, redness, swelling, or a rash around the fingers and may sometimes affect other areas, such as the face or eyelids.
Avoid skin contact entirely. If a reaction develops, stop using the product and seek medical advice.
Using an unsuitable lamp
A lamp that is incompatible with the formulation may not cure the material adequately. Follow the manufacturer’s lamp and curing specifications rather than relying on wattage alone.
Skipping nail preparation
Oil, dust, moisture, or unsuitable preparation can interfere with adhesion. Prepare the nail according to the product instructions, but do not aggressively scrape or thin the nail plate.
Making extensions too long
Long extensions place additional mechanical stress on the natural nail. Beginners may find short or medium lengths easier to shape, maintain, and remove safely.
Peeling or pulling off the enhancement
Picking off polygel can remove layers of the natural nail. This may result in brittleness, surface damage, or nail separation. Use the removal method recommended for the specific system instead.
How to Make Polygel Nails Last Longer
A few practical habits can help maintain the appearance of your manicure.
- Keep the product away from your skin during application.
- Use the correct lamp and follow the complete curing instructions.
- Avoid excessively thick or poorly balanced extensions.
- Wear protective gloves when cleaning or handling harsh household products.
- Use your fingertips rather than your nails to open cans, scrape labels, or pry objects.
- Apply cuticle oil regularly to help keep the surrounding skin moisturized.
- Avoid picking at lifted areas or trying to glue down a damaged enhancement.
- Arrange professional maintenance when needed rather than allowing excessive growth or lifting to develop.
Lifting creates spaces where moisture and debris can collect. Do not seal a lifted area with additional product. Remove or repair the enhancement appropriately, and seek professional assessment if the natural nail appears discolored or infected.
How to Remove Polygel Nails Safely
Removal depends on the specific product formulation. Many polygel systems are primarily removed by filing, while some products may allow additional removal steps. Acetone should not be assumed to dissolve every polygel enhancement completely.
For safer removal:
- Check the manufacturer’s removal instructions.
- Avoid pulling, peeling, or forcibly lifting the enhancement.
- File carefully and stop before reaching the natural nail.
- Avoid aggressive electric filing if you lack the training to use an e-file safely.
- Consider professional removal, particularly for thick extensions or unfamiliar products.
- Moisturize the nails and surrounding skin afterward.
If your nails become painful, unusually thin, separated from the nail bed, or persistently discolored, stop applying enhancements and consult a dermatologist or other qualified healthcare professional.
Are Polygel Nail Kits Safe to Use at Home?
Home application can be convenient, but it requires careful product handling. Nail enhancement products may contain acrylate-related ingredients that can cause irritation or allergic reactions, particularly when uncured material contacts the skin or is inadequately cured.
Use products according to their labels, maintain good ventilation, and avoid breathing filing dust. A suitable dust extractor can help reduce airborne particles during filing. Keep products away from the eyes and out of reach of children.
UV and LED nail lamps also require sensible precautions. Follow the lamp instructions and consider applying broad-spectrum sunscreen to exposed skin on the hands before a manicure, or using fingerless UV-protective gloves that leave the nails exposed.
Avoid home application if you cannot verify the product’s ingredients, lamp compatibility, or curing instructions. People with a history of nail-product allergies should seek professional medical advice before trying another enhancement system.
Polygel Nails vs. Acrylic Nails
Polygel and acrylic systems can both create durable nail enhancements, but they differ in their application methods.
| Feature | Polygel | Traditional acrylic |
|---|---|---|
| Product format | Usually a premixed gel-like material | Powder mixed with liquid monomer |
| Working consistency | Thick and putty-like | Depends on the powder-liquid ratio |
| Hardening method | Typically cured under a compatible lamp | Usually hardens through a chemical reaction |
| Shaping | Often sculpted with a brush and slip solution | Sculpted using an acrylic brush |
| Odor | Often less noticeable, depending on the formula | Liquid monomer may have a noticeable odor |
| Removal | Often requires careful filing | Usually requires a system-specific removal process |
| Learning curve | Requires practice with shaping and curing | Requires practice with mixing and sculpting |
Neither system is automatically safer in every situation. Product formulation, application technique, ventilation, curing, and removal all affect the experience and potential risks.
Frequently Asked Questions
1. What is included in a polygel nail kit?
A typical kit may include polygel, a brush, a spatula, nail forms, files, and base and top coats. Some sets also include a curing lamp, slip solution, nail tips, and decorative accessories. Check the product listing to confirm the contents.
2. Are polygel nails suitable for beginners?
Yes, beginners can learn the technique with practice. The thick consistency provides control while shaping, but choosing the correct form, preventing skin contact, and ensuring proper curing require care.
3. How long do polygel nails last?
A well-applied set commonly lasts around two to three weeks, although results vary with nail growth, preparation, product quality, and daily activities.
4. Do polygel nails require a UV or LED lamp?
Most polygel systems require a compatible UV or LED lamp to cure. Always follow the manufacturer’s instructions because not every lamp works with every formula.
5. Can I apply polygel directly to natural nails?
Yes. Many systems can be used as an overlay to add structure without creating a long extension. The natural nail still requires careful preparation and the correct application method.
6. Can I use regular nail polish over polygel?
Many cured polygel enhancements can be painted with regular nail polish. Allow traditional polish to dry fully before applying another layer. For gel polish, use a compatible system and follow its curing instructions.
7. Why are my polygel nails lifting?
Lifting may result from product touching the cuticle, inadequate preparation, moisture or oil on the nail, incorrect curing, or poor application technique. Do not cover lifted areas with more product; address the cause and inspect the natural nail.
8. Can polygel damage natural nails?
Yes, damage can occur if the nail is over-filed, the enhancement is peeled off, or removal is too aggressive. Gentle preparation and appropriate removal help reduce the risk.
9. Can I remove polygel nails at home?
Some people remove them at home, but the method depends on the product. Many systems require careful filing, and aggressive filing can damage natural nails. Professional removal is a sensible choice if you are inexperienced.
10. Is a polygel nail kit worth buying?
It may be worthwhile if you enjoy doing your nails, want to experiment with different shapes, and are willing to learn the application and removal process. Compare the kit’s contents, lamp compatibility, instructions, and safety information before purchasing.
Conclusion
A polygel nail kit can be a useful option for creating customized overlays and extensions at home. Its thick consistency offers control during shaping, and the finished nails can be styled in many ways, from natural-looking manicures to detailed nail art.
For the best results, select a reputable kit, prepare your nails gently, use a compatible lamp, and prevent uncured product from touching the skin. Regular maintenance and careful removal are just as important as application. With patience and attention to safety, you can create a neat manicure while reducing the risk of avoidable nail damage.