Cat Eye Nail Polish: Designs and Magnetic Manicure Ideas
Introduction
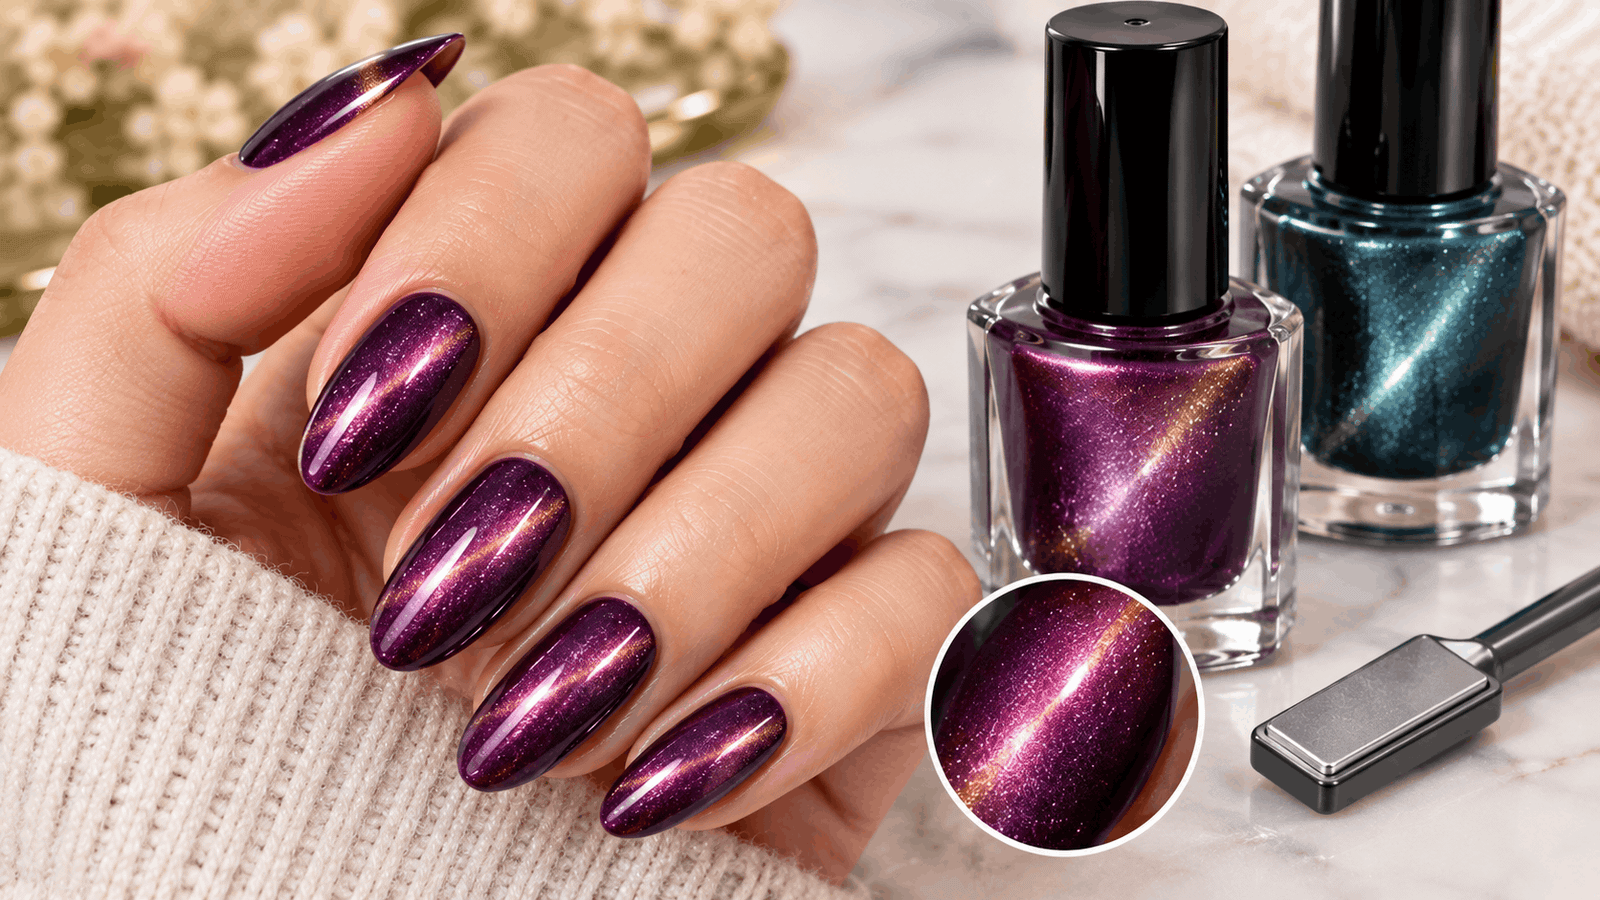
Cat eye nail polish is a stylish way to create a manicure that looks glossy, dimensional, and full of movement. Unlike traditional nail polish, which usually produces a flat color or simple shimmer, this special formula creates a bright reflective effect that shifts as the nails catch the light. The result resembles the narrow glow seen in a cat’s eye or the changing reflections of a polished gemstone.
This manicure uses magnetic pigments and a special magnet to create different patterns, from a sharp line across the nail to a soft, velvet-like glow. It is available in many shades, including emerald green, deep burgundy, sapphire blue, rose pink, silver, and neutral beige. These options make it suitable for everyday wear, formal occasions, parties, and creative nail art.
Whether you prefer short natural nails or long almond-shaped extensions, a magnetic manicure can be adapted to your personal style. With the right products and a little practice, you can also achieve the effect at home.
This guide explains how cat eye polish works, how to apply it, which colors and designs to try, how to maintain the finish, and what to consider when choosing products.
What Is Cat Eye Nail Polish?
Cat eye nail polish is a special type of magnetic nail lacquer or gel polish that contains tiny magnetic particles. When a magnet is held close to the wet polish, these particles rearrange into a pattern that reflects light in a concentrated band or glow.
The effect creates the illusion of depth, making the nail color appear to move when viewed from different angles. Depending on the formula, magnet, and application technique, the finish can look like a narrow beam of light, a glowing oval, or soft velvet.
Most salon-style cat eye manicures use magnetic gel polish, although some air-drying magnetic formulas are also available. Gel products typically require a compatible UV or LED nail lamp to cure, while regular lacquer dries according to its product instructions.
The technique is popular because it creates eye-catching nail art without requiring elaborate hand-painted details.
How Does Cat Eye Nail Polish Work?
The distinctive appearance comes from the interaction between magnetic pigments and a magnet.
The polish contains tiny particles that respond to a magnetic field. While the polish is still wet, the magnet guides these particles into a particular arrangement. Their new orientation changes how light reflects from the nail, producing the characteristic bright stripe or shimmering pattern.
Once the product is set or cured, the design becomes fixed.
Several factors influence the final appearance:
- Magnet position: Changes the direction and placement of the reflective line.
- Distance from the nail: Affects how concentrated or diffuse the effect appears.
- Polish color: Determines the overall tone and contrast.
- Base color: Can make the magnetic shimmer appear deeper or more dramatic.
- Timing: The pattern must be created before the polish dries or the gel is cured.
- Magnet shape: Different tools can produce lines, curves, halos, and other effects.
This is why the same polish can produce several different looks without changing the color.
Popular Cat Eye Nail Polish Colors
Choosing the right shade is one of the easiest ways to personalize your manicure. Some colors create dramatic contrast, while others offer a soft, elegant finish.
1. Emerald Green
Emerald green magnetic polish creates a rich, jewel-like appearance. A bright green reflection against a deeper background gives the nails a luxurious finish.
This shade works well for evening events, autumn outfits, and anyone who enjoys bold colors.
2. Burgundy and Wine Red
Burgundy cat eye nails combine deep red tones with a glowing metallic reflection. They are particularly appealing for dinners, weddings, winter celebrations, and formal occasions.
For a dramatic effect, choose a deep wine shade with a narrow silver or rose-gold shimmer.
3. Midnight Blue
Midnight blue offers a sophisticated alternative to black. Its reflective stripe may appear icy blue, silver, or turquoise depending on the formula and lighting.
This color suits both long almond nails and short square shapes.
4. Black Cat Eye Polish
Black magnetic polish creates strong contrast and emphasizes the reflective pattern. The finish can resemble a dark gemstone with a bright beam running through it.
It is an excellent option for a bold manicure or a modern evening look.
5. Rose Pink
Rose pink provides a softer, more romantic interpretation of the trend. Its shimmering finish adds dimension without looking overly dramatic.
This shade works well for everyday manicures, bridal looks, and minimalist nail designs.
6. Silver and Gray
Silver and gray create a cool-toned, futuristic appearance. They pair well with chrome details, black accents, and geometric nail art.
These shades are suitable for people who prefer metallic finishes over traditional bright colors.
7. Purple and Violet
Purple magnetic polish can range from soft lavender to deep plum. Darker shades create a dramatic glow, while lighter versions offer a delicate, iridescent appearance.
8. Nude and Champagne
Nude, taupe, and champagne shades provide an understated alternative to darker magnetic colors. Their reflective finish resembles shimmering fabric and complements neutral outfits.
These shades are particularly useful when you want nail art that looks polished without being too bold.
Beautiful Cat Eye Nail Design Ideas
Magnetic polish can be used in many ways. The position of the magnet, choice of colors, and shape of the nails all influence the final design.
1. Classic Diagonal Cat Eye
A diagonal reflective stripe is one of the most recognizable magnetic nail designs. The angled light band creates movement and makes even a single-color manicure look more detailed.
Try this technique with emerald green, navy blue, burgundy, or black polish.
2. Velvet Cat Eye Nails
The velvet effect creates a soft, multidimensional shimmer across most of the nail rather than concentrating the light into one narrow stripe.
It works especially well with champagne, mauve, sage green, and dusty rose shades. The finish looks subtle in some lighting and luminous in others.
3. Galaxy-Inspired Nails
Galaxy designs combine dark backgrounds with bright magnetic reflections. Navy, purple, black, and teal are popular choices because they resemble the colors of a night sky.
You can add a few small star details or delicate glitter accents, but keeping the decoration limited allows the magnetic finish to remain the focus.
4. French Tip Cat Eye
This design combines the clean appearance of a French manicure with magnetic shimmer. The tips may feature silver, pink, or gold reflections over a neutral base.
A French-inspired magnetic manicure is a good option for people who want something elegant but more distinctive than a standard French tip.
5. Cat Eye With Gold Accents
Gold details can make a magnetic manicure look more luxurious. Consider thin gold lines, small metallic shapes, or a gold accent on one nail.
Deep green, black, chocolate brown, and burgundy are particularly effective combinations.
6. Pink Magnetic Nails
Pink magnetic polish creates a soft glow that can be romantic, playful, or glamorous depending on the shade.
Pale pink offers a delicate look, while fuchsia and berry tones create stronger contrast. A glossy top coat helps emphasize the reflective finish.
7. Cat Eye Ombre
An ombre manicure blends one color into another, creating a gradual transition. Magnetic shimmer can be layered into the design to add depth.
For example, a transition from deep purple to blue can create a dramatic, jewel-like effect. This technique may require more practice than a simple magnetic stripe.
8. Minimalist Accent Nails
You do not need magnetic polish on every finger. Apply it to one or two accent nails and use a complementary solid color on the remaining nails.
This approach creates visual interest while keeping the manicure simple enough for everyday wear.
9. Short Cat Eye Nails
Short nails can look just as attractive with magnetic polish as longer nails. A narrow stripe, soft velvet effect, or subtle shimmer works particularly well on short square and rounded shapes.
Choose a color you enjoy and keep additional decorations small to avoid overcrowding the nail.
10. Seasonal Magnetic Designs
You can adapt the finish to different seasons and occasions.
- Spring: Pastel pink, lavender, and soft green.
- Summer: Turquoise, coral, and bright blue.
- Autumn: Burgundy, copper, chocolate, and olive.
- Winter: Silver, navy, emerald, and deep purple.
- Celebrations: Gold, ruby red, and shimmering black.
These are style suggestions rather than strict rules, so you can wear any shade whenever it suits your preferences.
How to Apply Cat Eye Nail Polish at Home
A magnetic manicure can be completed at home if you have the correct products and follow the instructions for your specific formula.
Step 1: Prepare Your Nails
Remove any old polish and wash your hands. Shape the nails with a file and gently care for the cuticles without cutting or damaging the surrounding skin.
Make sure the nail surface is clean and dry. If you are using gel polish, follow the manufacturer’s preparation instructions.
Step 2: Apply a Base Coat
Apply a suitable base coat if recommended for your product. For gel polish, use a base coat compatible with the gel system.
Cure it under the specified lamp if the instructions require curing.
Step 3: Apply the First Color Layer
Apply a thin coat of magnetic polish. Some products recommend curing this first layer before adding another, while air-drying formulas have different requirements.
Follow the product directions rather than assuming every formula works the same way.
Step 4: Apply the Magnetic Layer
Apply a thin, even layer of magnetic polish to one nail. Keep this layer workable so the magnetic particles can move.
Avoid applying excessive product, particularly near the cuticles or sidewalls.
Step 5: Position the Magnet
Hold the recommended magnet above the wet polish without touching the nail. Move or angle it according to the effect you want.
A straight position can create a classic line, while an angled position can produce a diagonal reflection. Different magnet shapes may create other patterns.
The distance and holding time depend on the magnet and polish. Follow the manufacturer’s guidance and keep the tool steady while the pattern forms.
Step 6: Cure or Allow the Polish to Dry
For magnetic gel polish, cure the nail under the specified UV or LED lamp as directed. The design should be set promptly after creating the effect so the particles do not lose their arrangement.
For air-drying magnetic lacquer, allow the product to dry according to its instructions.
Work on one nail at a time when recommended, especially if the magnetic pattern begins to soften before it is set.
Step 7: Apply a Top Coat
Apply a compatible top coat to protect the manicure and enhance shine. Gel top coats need to be cured according to their instructions, while regular top coats must be allowed to dry fully.
Avoid getting uncured gel on the skin. Repeated skin contact with uncured gel products can cause allergic reactions.
Step 8: Clean Up and Maintain
Follow the product’s instructions for removing any residue. Keep the skin around the nails moisturized and avoid picking or peeling the polish.
If you use gel products, remove them using the appropriate method rather than forcibly pulling them off.
Cat Eye Gel Polish vs. Regular Magnetic Nail Polish
Although both types can create a magnetic effect, their application and maintenance differ.
| Feature | Magnetic gel polish | Air-drying magnetic polish |
| Setting method | UV or LED lamp, as specified | Dries in air |
| Equipment | Compatible lamp and magnet | Magnet and usual manicure tools |
| Finish | Often produces a crisp, glossy effect | Varies by formula |
| Application | Requires attention to curing and timing | Requires attention to drying time |
| Removal | Depends on whether the gel is soak-off or file-off | Usually removed with a suitable polish remover |
| Best suited for | People comfortable following gel instructions | People who prefer not to use a curing lamp |
Neither type is automatically better for everyone. The right choice depends on your experience, preferred finish, available equipment, and product instructions.
How to Make Your Magnetic Manicure Last Longer
A few simple habits can help maintain the appearance of your nails.
Prepare the Nail Surface Properly
Clean, dry nails provide a better starting point. Follow the manufacturer’s instructions for removing oils and applying base products.
Avoid Thick Layers
Thin, even coats are generally easier to control and less likely to create an uneven finish.
Seal the Free Edge
When the product instructions allow it, lightly seal the tip of the nail with the top coat. This can help reduce chipping.
Protect Your Hands During Chores
Wear suitable gloves when cleaning or working with detergents. Prolonged contact with water and chemicals can affect the manicure and irritate the skin.
Do Not Pick at the Polish
Peeling or picking off polish can damage the natural nail surface. Use the recommended removal method instead.
Follow the Correct Curing Instructions
Under-curing gel can leave product incompletely hardened. Use a compatible lamp and follow the specified curing times. A thicker layer or incompatible lamp may prevent proper curing.
Common Mistakes to Avoid
Even a simple magnetic design can look different from what you expected. These are common problems and ways to address them.
The magnetic line looks faint: The magnet may be too far away, the formula may have a subtle effect, or the technique may need adjustment. Check the product instructions and experiment on one nail.
The pattern looks blurry: The polish may have been left workable for too long before setting. Create the pattern and set it promptly according to the product directions.
The finish looks uneven: Thick coats, inconsistent application, or an unsteady magnet can produce irregular results. Use thin layers and rest your hand on a stable surface.
The polish does not cure properly: Check that you are using a compatible lamp and the recommended curing time. Do not assume that a tacky layer is always cured or that a stronger lamp automatically makes every product safe.
The manicure chips early: Nail preparation, product compatibility, application thickness, and daily activities can all affect wear. Follow the complete application and removal instructions.
Nail Health and Safety Tips
Beautiful nail art should not come at the expense of nail health.
Choose Products From Reliable Sources
Check labels and instructions before using magnetic polish, especially if you are buying gel products online. Avoid unlabeled products or formulas with unclear ingredient information.
Prevent Skin Contact With Uncured Gel
Gel polish can contain ingredients that cause allergic contact dermatitis when they touch the skin before curing. Avoid applying it over cuticles or onto the surrounding skin. If uncured product touches the skin, follow the manufacturer’s safety instructions and remove it appropriately before curing.
If you develop persistent itching, redness, swelling, blistering, or nail changes, stop using the product and seek medical advice.
Use Nail Lamps Correctly
Follow the lamp and polish manufacturer’s instructions. Some UV nail lamps emit ultraviolet radiation, so consider reducing unnecessary exposure and using fingerless UV-protective gloves or appropriate broad-spectrum sunscreen on exposed skin, while keeping sunscreen off the nail plate if it could interfere with the manicure.
Remove Polish Gently
Do not rip off gel polish or aggressively file the natural nail. If you are unsure how to remove a particular product, consult a qualified nail professional.
Allow Damaged Nails to Recover
If your nails become thin, painful, or damaged, pause artificial nail applications and allow them to recover. Persistent nail discoloration or separation may require medical assessment.
How to Choose the Best Cat Eye Nail Polish
The best product depends on the look you want and how you prefer to do your manicure.
Consider the following points:
- Color range: Choose a shade that complements your wardrobe and preferred nail designs.
- Magnetic effect: Some formulas create a narrow, defined stripe, while others offer a diffuse shimmer.
- Formula type: Check whether the product is gel-based or air-drying.
- Magnet compatibility: Make sure you have a suitable magnet for the effect.
- Ease of application: Beginners may prefer a straightforward single-line design.
- Removal method: Understand how the product must be removed before applying it.
- Ingredient information: Review product labeling and any relevant safety guidance, particularly if you have experienced nail-product allergies.
You do not need an expensive collection to get started. One versatile shade, a compatible magnet, and the correct application tools can be enough to explore the look.
Conclusion
Cat eye nail polish creates a distinctive magnetic manicure with a reflective stripe or velvet-like glow that changes as the nails catch the light. Its versatility makes it suitable for many styles, from simple nude nails to dramatic emerald, burgundy, and midnight-blue designs.
Achieving the effect involves applying a suitable magnetic formula, positioning a magnet while the polish is workable, and setting the product according to its instructions. Careful application, proper removal, and attention to nail health can help you enjoy the finish while minimizing damage and irritation.
Whether you choose a salon manicure or experiment at home, the best design is one that suits your nail shape, personal taste, and daily routine.
Frequently Asked Questions (FAQs)
1. What is cat eye nail polish?
It is a special nail lacquer or gel polish containing magnetic pigments. A magnet rearranges these particles before the polish sets, creating a reflective stripe or multidimensional shimmer.
2. Do you need a special magnet for cat eye nails?
A suitable nail-art magnet is recommended because it is designed to create the desired magnetic pattern. Different shapes can produce straight lines, curves, halos, and velvet-like effects.
3. Can you use cat eye nail polish without a UV lamp?
Yes, if you choose an air-drying magnetic formula. However, many salon-style products are gel polishes that require a compatible UV or LED lamp. Always check the label before applying the product.
4. How long does a cat eye manicure last?
Its longevity depends on the formula, nail preparation, application technique, and daily activities. A well-applied gel manicure may last longer than regular lacquer, but no particular duration is guaranteed.
5. What are the best colors for cat eye nails?
Popular choices include emerald green, burgundy, black, midnight blue, silver, rose pink, purple, and champagne. The best shade depends on your preferred style and the level of contrast you want.
6. Can beginners apply cat eye nail polish at home?
Yes. Beginners can start with a simple magnetic stripe using thin coats, a suitable magnet, and careful timing. Gel users should also learn the correct curing and removal procedures.
7. Why is my cat eye nail effect not showing?
The magnet may be too far away, the product may not contain magnetic pigments, or the polish may have started setting before the design was created. Check the product instructions and adjust your technique.
8. Are cat eye nails suitable for short nails?
Yes. Short square, rounded, and oval nails can all look attractive with magnetic polish. A narrow stripe or soft shimmer can create a polished effect without requiring long extensions.
9. Is cat eye gel polish safe for natural nails?
It can be used with appropriate application and removal practices, but improper curing, skin contact with uncured gel, and forceful removal can cause problems. Follow product instructions and stop using the product if irritation develops.
10. How do you remove cat eye nail polish?
Removal depends on the formula. Regular lacquer can usually be removed with a suitable nail polish remover, while gel products may require a specific soak-off or professional removal method. Never peel or forcefully scrape the product from the nail.